

Please Note:This documentation references invoca.net in the Web Integration examples below. However, previous installations referencing ringrevenue.com are still valid.
Installation Instructions
1
From the Advertiser Home Page, choose Tools gear, Web Integration.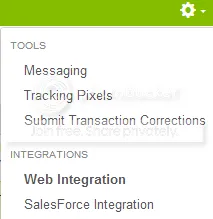
2
In the Web Integration, Settings tab, enter the phone number to replace on your website.
3
Click Update.
4
Click “Get Code” tab to access your custom generated web integration code.
5
Place the web integration code on your website (every page where you want to display the promo number) in the footer just above the
</body> tag. This step only has to be done once.Testing the code
1
To test web integration inside the platform, from the Web Integration panel, click Integration Test. Select “Open Test”. Click “Start Test”.If the test is successful, the results return a green checkmark.
 If the test is unsuccessful, the results return with a red exclamation. The web integration code is not installed properly or the landing page cannot be found. See Web Integration Troubleshooting below.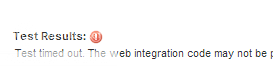
2
To test web integration outside the platform, in a browser enter the landing page URL, or other web integrated page’s URL, and append PPCPN=9999999999.
If the URL has a query string, use an “&” to append the PPCPN, for example:
If the URL does not have a query string, use a “?” to append the PPCPN, for example:
If the test is successful, the number or numbers on the page change to 999-999-9999.
If test is unsuccessful, the number or numbers do not change to 999-999-9999. See Web Integration Troubleshooting below.
If the URL has a query string, use an “&” to append the PPCPN, for example:
http://www.invoca.com/corporate/landhere/?r=1&PPCPN=9999999999If the URL does not have a query string, use a “?” to append the PPCPN, for example:
http://www.invoca.com?PPCPN=9999999999If the test is successful, the number or numbers on the page change to 999-999-9999.
If test is unsuccessful, the number or numbers do not change to 999-999-9999. See Web Integration Troubleshooting below.
Web Integration Troubleshooting
- Check that the phone number is entered in the Web Integration, Settings tab and matches the phone number on your website.
- If you display other phone numbers in addition to the number entered in Web Integration, Settings tab, make sure you are using additional client side Web Integration settings to accommodate multiple phone numbers. See below for examples.
- Check for syntax errors on the page, for example, missing commas or brackets.
Web Integration Settings
Web Integration settings can be set on the server or the client side (browser side). As an example, the NumberToReplace field can be set on the platform(server side) and in the JavaScript function(client side). A large majority of advertisers only need to configure the settings on the platform or server side. Including Web Integration settings on the client side should only be done if the Web Integration’s behavior needs to be customized. The client side settings always takes precedence over the server side.Server Side Integration
All of the server side settings are defined in the Web Integration, Settings tab.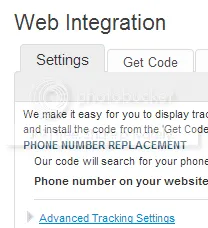
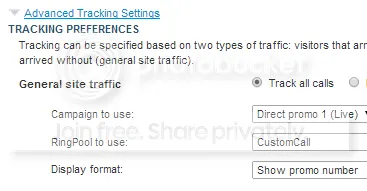
Client Side Integration & Parameters
The client side settings are listed in the table below. Most installations do not require any client side changes. To initialize the Web Integration code, pass the integration settings in a hash to the Invoca.advertiser_integration function.Client Settings (Advanced)
numberToReplace vs. numberSelector There are two ways for the Web Integration code to know where to insert a tracking phone number. Note that you should only use one or the other, not both.- The numberToReplace option, which is the easy to use option, looks for the advertiser’s phone number on the web page and replaces it with the affiliate or publisher tracking phone number(promo number).
- The numberSelector option, which is the robust option used for customizing the Web Integration’s behavior, looks for an HTML element that has the same ID or class name and replaces the entire element with the affiliate or publisher tracking phone number(promo number) or a click-to-call button. Click-to-call only works with this option.
Selector information
All “selector” parameters are a comma separated list of IDs or classes, where IDs are prefixed with a “#” and classes are prefixed with a “.” (similar to referencing a class or ID using jQuery or prototype). Only a single class or single ID per selector is supported, no other jQuery selector syntax is supported.- Valid:
A single class:
.promoNumber
A single ID:#number
A list of classes:.promoNumber,.mainNumber - Not valid:
table > .promoNumber
.promoNumber:first
span#number
Simple Examples
Default example of replacing multiple phone numbers on a page, with no additional options specified: ( ‘YOUR_ID_HERE’ represents where the unique advertiser ID is inserted.)Advanced Examples
Example changing the phone number presentation using the NumberSelector option on the client side:<span class=”promoNumber”>INSERT THIRD PARTY CODE HERE</span>
Example using callbacks for custom behavior. (Note that adding tel links to numbers now happens automatically, so using a callback is no longer necessary!)
Capturing Additional Parameters with JavaScript
You can capture additional RingPool parameters through client-side JavaScript using the poolParams option. In the following example, the visitor’s landing page timestamp is set to the poolParam “landingTime”.Displaying Different Numbers on Other Pages
Typically a visitor is “cookied” at a domain level and therefore is served the same number as they visit various web-integrated pages on the same domain. Use the “cookieId” option to set a unique cookie on different pages of a website. This allows different numbers to be served to the same visitor, depending on the page they visit. This example demonstrates how to allocate a unique number for the same user on two different pages. Any page that uses cookieId: “A” displays one number, and any page that uses cookieId: “B” displays another. Note: The cookie names (e.g. A, B) can be a custom name of your choosing.Online Click-To-Call (CTC) Form Settings
When online CTC is enabled, the default behavior is for the phone number on the page to be replaced by a “Call now” button. When clicked, a lightbox window pops up over the page prompting the user to enter their phone number. The logo shown in the lightbox can be customized in the platform on the Customize Online Click-to-Call Form page accessed from Tools, Web Integration, Settings tab, Advanced Tracking Settings link. Example of customizing the “Call now” button when using online CTC.- On the server, you can have a list of RingPool / Campaign ID pairs, and associate each pair with a key. In the example below, the key is the referring page’s domain.
- Find the correct ID pairs for a given request, and make them available for the view template.
- Insert the ID pair into the web integration code using the template.
Elegantly Swap Phone Number with jQuery
By default, the Advertiser Web Integration code swaps a static phone number with a campaign number when a landing page loads. Occasionally, visitors may notice that the number changes. The following example shows how to hide the static number on a landing page, and only show the Promo Number after the code runs. Additionally, in the event that no promo number is available, the code displays the original static number. Directions: Update var PHONE_SELECTOR to be the selector wrapping the phone number to be replaced. Update var FADE_SPEED to be the length of the fade in milliseconds. In the HTML, wrap your phone numbers in a span tag with the class “phone-number”.<span class=”phone-number”>STATIC NUMBER HERE</span>.